Air-suspension FRONT AIR SPRING RANGE ROVER Manuel d'utilisateur

Naviguer en ligne ou télécharger Manuel d'utilisateur pour Pour la voiture Air-suspension FRONT AIR SPRING RANGE ROVER. Air Suspension FRONT AIR SPRING RANGE ROVER User Manual Manuel d'utilisatio

  • Télécharger
  • Ajouter à mon manuel
  • Imprimer
  • Page
    / 1
  • Table des matières
  • MARQUE LIVRES
  • Noté. / 5. Basé sur avis des utilisateurs
Vue de la page 0
7
9
4
6
A
DWG. NO.
SIZE
WEIGHT:
0
FRONT-ILLUSTRATION-A
REV.
PROPRIETARY AND CONFIDENTIAL
THE INFORMATION CONTAINED IN THIS
RLS
MATERIAL
FINISH
DO NOT SCALE DRAWING
APPLICATION
USED ON
DRAWING IS THE SOLE PROPERTY OF
REPRODUCTION IN PART OR AS A WHOLE
PROHIBITED.
COMMENTS:
SHEET 1 OF 1
Q.A.
MFG APPR.
ENG APPR.
CHECKED
DRAWN
ARNOTT, INC. IS
WITHOUT THE WRITTEN PERMISSION OF
NEXT ASSY
RANGE ROVER
ARNOTT, INC. ANY
NAME
05/31/06
DATE
FRONT AIR SPRING
DIMENSIONS ARE IN INCHES
TOLERANCES:
FRACTIONAL
ANGULAR: MACH BEND
TWO PLACE DECIMAL
THREE PLACE DECIMAL
SCALE:1:4
7
6
FRONT AIR SPRING ASSEMBLY
Removal
WARNING: The air suspension system is under pressure (up to 10 bar, or
150 lbf/in²). Do not allow dirt or grease to enter the system. Always wear standard
protective hand, ear, and eye protection when servicing the air suspension system.
WARNING: Do not inflate the air spring assembly unless it is supported on
both ends by the vehicle frame and suspension system. An unrestricted or
unsupported air spring could cause serious injury and damage to the air
spring assembly. DO NOT DISASSEMBLE THE AIR SPRING!
1. Raise the vehicle on a hoist or other adequate structure. WARNING: Always support the
vehicle on safety stands. Refer to your owner’s manual for correct lifting instructions.
2. Remove front wheel arch liner.
3. Support the chassis from under front cross member.
4. Depressurize the air spring by removing the hose.
5. Clean surrounding area and seal off hose and spring.
6. Remove top clips securing air spring to chassis.
7. Remove the lower bolt securing air spring retaining pin to axle bracket. Remove the retaining pin.
8. Raise chassis on jack for clearance, and remove the old air spring assembly.
WARNING: Support chassis on safety stands. When refitting the new
air spring, do not allow the vehicle to rest on the deflated air spring. The chassis must
be supported until the new air spring is inflated.
Refitting
11. Refit air spring to the front axle, fit retaining pin and secure pin with the bolt.
12. Remove the support from under chassis and lower chassis onto the top of the air spring.
Resupport chassis on safety stands. Fit the clip to secure the top of the air spring to chassis.
13. Remove seals from air spring and air hose. Clean hose and reconnect it to the new air spring.
14. Fit wheel arch liner.
15. Remove all safety stands and lower vehicle.
16. Perform a leak test on the air spring and connector with a soapy water solution.
WARNING: Make sure to tighten all wheel hub bolt nuts to 115-142 Nm (85-
105 lb/ft).
Vue de la page 0
1

Résumé du contenu

Page 1 - FRONT AIR SPRING

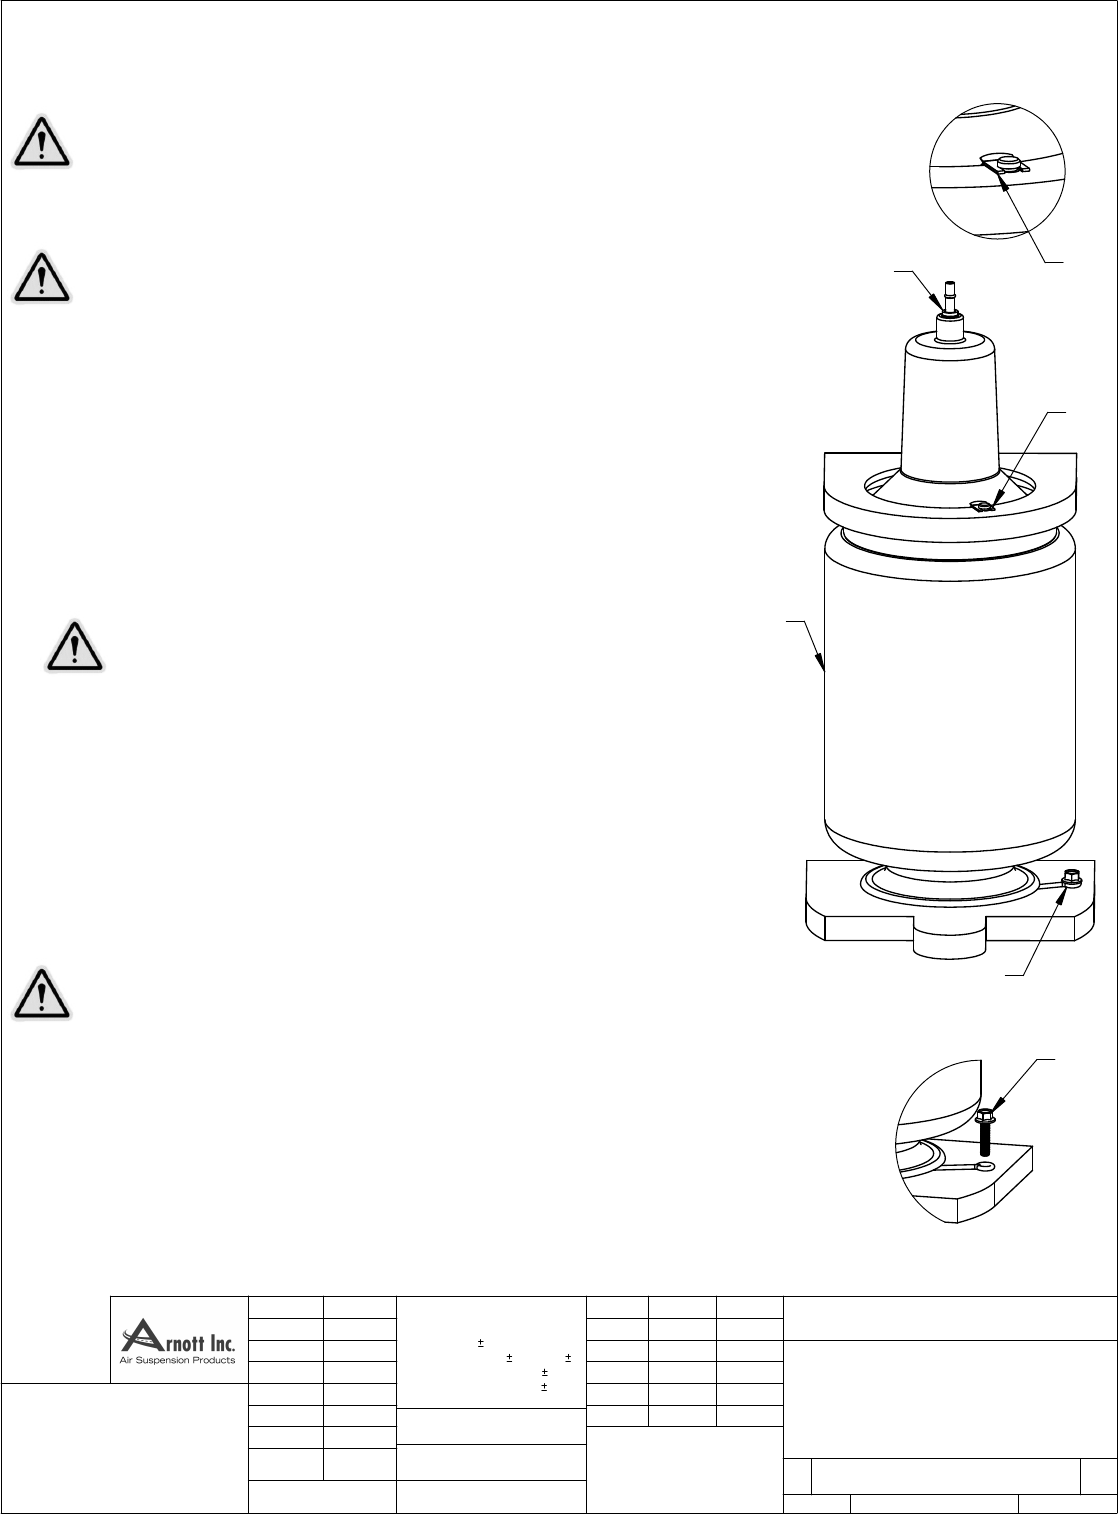
7946ADWG. NO.SIZEWEIGHT: 0FRONT-ILLUSTRATION-AREV.PROPRIETARY AND CONFIDENTIALTHE INFORMATION CONTAINED IN THISRLSMATERIALFINISHDO NOT SCALE DRAWI

Commentaires sur ces manuels

Pas de commentaire